Fork-Tender Yankee Pot Roast: The Ultimate Guide to Comfort in Any Kitchen
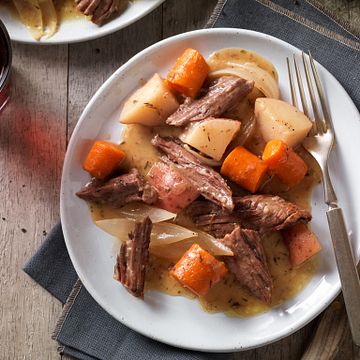
Imagine a dish that embodies warmth, tradition, and profound satisfaction. A meal so tender it effortlessly falls apart with the mere suggestion of a fork, bathed in a rich, savory gravy, and surrounded by perfectly cooked, hearty vegetables. This, my friends, is the magic of a
Yankee Pot Roast: Melt-in-Your-Mouth Comfort & Savory Gravy. It's more than just a recipe; it's an experience, a soulful journey that transforms simple ingredients into an unforgettable feast. While it might ask for a few hours of patient cooking, the reward – pure comfort food bliss – is unequivocally worth every minute. Whether you're seeking solace on a chilly evening or preparing a heartwarming centerpiece for a Sunday family dinner, a classic Yankee pot roast is always a welcome sight.
The beauty of this enduring classic lies in its simplicity and the forgiving nature of its core technique: braising. By understanding a few fundamental principles and exploring various cooking methods, you can achieve that coveted fork-tender perfection in your own kitchen, no matter your preferred equipment. Let's delve into the best practices and techniques to master this beloved dish.
The Heart of the Matter: Understanding Yankee Pot Roast Excellence
At its core, Yankee pot roast is a testament to the transformative power of low and slow cooking. It takes a humble, tougher cut of beef and renders it into something extraordinarily succulent and flavorful. But what truly defines this dish and contributes to its exceptional character?
Choosing Your Canvas: The Right Cut of Beef
The foundation of any great pot roast is the beef itself. You're looking for cuts rich in connective tissue, which, when cooked slowly, breaks down into gelatin, creating that melt-in-your-mouth texture and contributing body to your gravy.
*
Beef Chuck Roast: Often considered the gold standard for pot roast. It's well-marbled, flavorful, and loaded with connective tissue, making it ideal for long, moist cooking methods. Its structure allows it to absorb flavors beautifully and become incredibly tender.
*
Beef Round Tip Roast: A leaner option than chuck, but still suitable for braising. While it may require a slightly longer cooking time to achieve the same tenderness, it offers a delicious alternative. Other options include brisket or short ribs, each lending a slightly different character to the finished dish.
A Symphony of Flavors: Beyond Just Meat
While the beef is the star, the supporting cast of aromatics, vegetables, and rich liquids creates the dish's signature depth. Traditional additions typically include onions, carrots, and celery – the classic mirepoix – which lay a foundational layer of savory sweetness. Garlic adds a pungent kick, while herbs like bay leaf, rosemary, and thyme infuse the entire dish with an earthy fragrance. The braising liquid, often a combination of beef broth and red wine, beer, or even just water, is crucial for tenderizing the meat and forming the rich gravy that ties everything together.
Mastering the Fundamentals: Essential Steps for Any Method
Regardless of whether you choose the stovetop, oven, slow cooker, or Instant Pot, certain foundational steps are non-negotiable for achieving a truly spectacular Yankee pot roast. These are the secrets to unlocking maximum flavor and tenderness.
The Art of the Perfect Sear: Building Flavor from the Start
This is arguably the most critical step, often overlooked by beginners. Searing the roast on all sides before braising isn't just for aesthetics; it's a fundamental flavor-building technique.
*
Why it Matters: The intense heat caramelizes the natural sugars and proteins on the meat's surface, creating a rich brown crust through the Maillard reaction. This process develops complex, savory flavors that can't be achieved any other way and adds a beautiful color to the finished dish.
*
How to Achieve It: Pat your roast thoroughly dry with paper towels – moisture prevents browning. Heat a heavy-bottomed pot or Dutch oven (cast iron is ideal) over medium-high heat with a good quality olive oil or other high smoke-point oil. Once shimmering, add the roast and brown it deeply on all sides. This isn't a quick task; aim for a solid 5-7 minutes per side, potentially taking 20-30 minutes total. Don't overcrowd the pot; sear in batches if necessary.
Building Layers of Flavor: Aromatics and Liquids
Once the beef is beautifully seared, the next step is to build the aromatic base and introduce the braising liquid.
*
Sautéing Aromatics: In the same pot, after removing the seared beef, add your chopped onions, carrots, and celery. Cook them down until they soften and begin to brown slightly, scraping up any delicious browned bits from the bottom of the pot (fond). Add minced garlic towards the end of this process to prevent it from burning.
*
Deglazing and Liquid: Pour in your chosen liquid – be it dry red wine, stout beer, or additional beef broth. Bring it to a simmer, allowing it to reduce slightly and concentrate its flavors. This step also helps deglaze the pot, dissolving those flavorful browned bits into the liquid, which will become part of your incredible gravy. Follow with beef broth, and consider a tablespoon or two of tomato paste for added umami depth, along with your chosen herbs and spices like allspice berries, bay leaves, fresh rosemary, or thyme.
The Golden Rule: Low and Slow for Unmatched Tenderness
This is the mantra of pot roast. Once the searing and flavor building are complete, the entire pot is covered and subjected to gentle, unwavering heat over an extended period.
*
The Science of Tenderness: Low temperatures (typically around 300-325°F in an oven, or the low setting on a slow cooker) slowly break down the tough connective tissues in the beef. This collagen melts into gelatin, creating that incredibly moist, tender, and "shreddable" texture that defines a perfect pot roast.
*
Patience is a Virtue: Don't be tempted to rush the process by cranking up the heat. While faster methods exist, the traditional low and slow approach yields the most consistently tender and flavorful results.
The Grand Finale: A Rich, Silky Gravy
No Yankee pot roast is complete without its accompanying gravy, thick, rich, and infused with all the savory goodness from the braising process.
*
Skimming the Fat: After the roast is cooked, carefully remove it from the pot and let it rest. During this time, you'll notice a layer of fat on top of the cooking liquid. For a leaner, more refined gravy, skim off as much of this excess fat as desired.
*
Thickening: Bring the liquid to a simmer on the stovetop. In a small bowl, whisk together a tablespoon or two of cornstarch with an equal amount of cold water to form a slurry. Slowly whisk this slurry into the simmering liquid, allowing it to thicken to your desired consistency. Continue to simmer for a few minutes to cook out any starchy taste. Taste and adjust seasoning with salt and pepper.
Your Kitchen, Your Method: Braising Options Explored
The beauty of Yankee pot roast is its adaptability. While the core principles remain, you have several excellent options for the actual cooking process.
The Classic: Dutch Oven (Stovetop or Oven)
This is the traditionalist's choice, offering excellent heat distribution and control.
*
Stovetop Method: After searing and building the liquid base, reduce the heat to low, cover the pot tightly, and simmer gently on the stovetop for 2 to 3 hours, or until the beef is fork-tender. Check occasionally to ensure the liquid isn't evaporating too quickly and that the heat is truly low.
*
Oven Method: Many chefs prefer the oven for its consistent, ambient heat that surrounds the pot evenly, preventing scorching. Preheat your oven to around 300-325°F (150-160°C). After searing and adding liquids/vegetables, cover the Dutch oven and transfer it to the preheated oven. Braise for 3-4 hours, or until the meat is incredibly tender. This method often yields slightly more uniform results.
The Hands-Off Champion: Slow Cooker
Perfect for busy weeknights or when you want dinner waiting for you.
*
Method: Complete the crucial searing and aromatic-sautéing steps on the stovetop first. Then, transfer the seared roast, cooked vegetables, and braising liquid to your slow cooker.
*
Timing: Cook on the LOW setting for 7-8 hours, or on HIGH for 4-5 hours, until the meat is easily shredded. The "set it and forget it" nature of the slow cooker makes it an incredibly convenient choice. Resist the urge to lift the lid too often, as this releases heat and moisture, extending cooking time.
The Speed Demon: Instant Pot (Pressure Cooker)
When time is of the essence, the Instant Pot is a game-changer, dramatically cutting down cooking time without sacrificing tenderness.
*
Method: Use the "Sauté" function to sear the roast and sauté the aromatics directly in the Instant Pot. Deglaze with liquid, add the beef, vegetables, and remaining liquid.
*
Timing: Secure the lid, set the valve to sealing, and cook on high pressure for 60-90 minutes (depending on the size and thickness of your roast). Allow a 10-minute natural pressure release before carefully opening the valve to quick release any remaining pressure. This allows the fibers of the meat to relax, retaining moisture.
Elevate Your Yankee Pot Roast: Tips for Perfection and Variations
To truly make your Yankee pot roast unforgettable, consider these additional tips and creative variations.
Beyond the Basics: Vegetable Swaps and Additions
While carrots, celery, and onions are traditional, don't hesitate to experiment.
*
Root Vegetables: Add parsnips, turnips, or even chunks of sweet potato for different flavor profiles and textures.
*
Mushrooms: Sautéed cremini or button mushrooms can add an earthy, umami depth.
*
Pearl Onions: For a touch of elegance and sweeter flavor, swap diced onions for peeled pearl onions added whole.
Flavor Boosters: Customizing Your Liquid
*
Wine vs. Beer: A dry red wine (like Merlot or Cabernet Sauvignon) adds richness and a subtle acidity that helps tenderize the meat. For a darker, maltier flavor, try a stout or dark ale. If you prefer to omit alcohol, simply substitute with extra beef stock.
*
Acidity: A tablespoon of apple cider vinegar or balsamic vinegar can brighten the flavors without adding a strong vinegar taste.
*
Fresh Herbs: Add fresh rosemary and thyme sprigs to the braising liquid for fragrant notes. Remove them before serving.
Serving Your Masterpiece
Once rested, slice or shred your fork-tender beef. Serve it generously with the rich gravy and the braised vegetables. Classic accompaniments include creamy mashed potatoes, fluffy egg noodles, or crusty bread perfect for soaking up every last drop of that incredible gravy.
Conclusion
Yankee pot roast is more than just a meal; it's a culinary hug, a symbol of comfort, and a testament to the rewards of patient cooking. By mastering the fundamental steps of searing, building layers of flavor, and embracing the "low and slow" philosophy, you can create a truly spectacular dish in any kitchen, using any method. Whether you choose the traditional Dutch oven, the convenient slow cooker, or the efficient Instant Pot, the result will be a deeply satisfying, fork-tender feast that warms the soul and delights the senses. So, gather your ingredients, set aside some time, and embark on the journey to create your best Yankee pot roast yet. For more in-depth techniques and solutions to common pot roast challenges, don't miss our comprehensive guide:
Unlock Perfect Yankee Pot Roast: Essential Tips for Tender Results. Happy cooking!