Unlock Perfect Yankee Pot Roast: Essential Tips for Tender Results
There are few dishes that evoke the heartwarming comfort and tradition quite like a perfectly executed Yankee Pot Roast. It’s more than just a meal; it's a culinary hug, a symbol of gathering, and a testament to the magic that happens when patience meets quality ingredients. Imagine: a succulent, melt-in-your-mouth roast, surrounded by tender, savory vegetables, all swimming in a rich, deeply flavored gravy. This isn't just wishful thinking; with the right techniques, you can consistently achieve these incredible results, transforming simple beef and vegetables into an unforgettable experience that truly embodies Yankee Pot Roast: Melt-in-Your-Mouth Comfort & Savory Gravy. While it may require a few hours of cooking time, trust us when we say that every delicious bite makes the wait worthwhile. Let's delve into the essential tips that will guide you to pot roast perfection.
The Foundation of Flavor: Mastering the Sear
Before your Yankee Pot Roast even begins its long, slow braise, there's a critical first step that lays the groundwork for all subsequent flavor: searing. This isn't just about aesthetics; it's about building a robust foundation of taste and color that permeates the entire dish. Skipping this step would be akin to reading only the first chapter of a great novel – you'd miss all the depth and development.
Why Searing is Non-Negotiable:
- Maillard Reaction: This scientific marvel is what creates those desirable brown crusts on food, producing hundreds of new flavor compounds. Searing the beef develops a complex, savory, almost nutty flavor that cannot be achieved by simply boiling the meat.
- Rich Color: A beautifully seared roast contributes significantly to the visual appeal of the final dish, making it look as incredible as it tastes.
- Depth for Gravy: The browned bits and fond left in the bottom of your pot after searing are invaluable. As you deglaze with wine or broth, these concentrated flavors dissolve, enriching your braising liquid and, subsequently, your gravy.
How to Achieve the Perfect Sear:
- Pat Dry: Ensure your beef chuck roast is thoroughly patted dry with paper towels. Moisture on the surface prevents browning; instead, it steams the meat.
- Hot Oil, Heavy Pot: Use a heavy-bottomed pot, ideally a cast-iron Dutch oven, over medium-high heat. Add a good amount of olive oil (about ¼ cup) and wait until it shimmers.
- Brown All Sides: Carefully place the floured (if dredging) or seasoned roast into the hot oil. Allow it to brown undisturbed for several minutes per side until a deep, rich crust forms. Don't rush this step! It can take up to 30 minutes to properly sear a 2-3 pound roast on all surfaces, including the ends. Patience here truly pays dividends.
Low & Slow: The Secret to Unrivaled Tenderness
Once your roast is beautifully seared and the aromatics (onions, carrots, celery, garlic) have been lightly browned in the flavorful fond, the real magic of braising begins. The adage "low and slow" is the undisputed cornerstone for achieving that coveted, fork-tender texture in your Yankee Pot Roast. High heat will simply toughen the meat, but gentle, prolonged cooking breaks down the tough connective tissues in cuts like chuck roast, transforming them into succulent, fall-apart goodness.
Understanding the Braising Principle:
Braising involves cooking meat submerged partially in liquid, covered, over low heat for an extended period. This moist-heat cooking method is ideal for tougher cuts of meat rich in collagen. As the collagen slowly breaks down, it converts into gelatin, which is responsible for the incredibly tender, juicy texture and also contributes to the body and richness of the gravy.
Choosing Your Method for Fork-Tender Yankee Pot Roast: Best Methods for Any Kitchen:
- Traditional Oven Braising: This classic method, often utilizing a Dutch oven, offers incredibly even heat distribution. After searing and adding liquid, cover your pot tightly and transfer it to a preheated oven (around 350°F initially, then often reduced to 300-325°F for longer cooks). A typical 2-3 pound roast will need 3-4 hours, or until it can be easily shredded with a fork. The steady, ambient heat of the oven prevents scorching and ensures consistent cooking.
- Stovetop Simmer: If you prefer to keep an eye on things, a stovetop braise is possible in a heavy-bottomed pot. After searing, reduce the heat to the absolute lowest setting once the liquid is added and simmering. Ensure the pot is tightly covered and monitor occasionally to prevent sticking. This method typically takes 2-3 hours for a 3-pound beef round tip roast.
- Slow Cooker Method: For ultimate convenience, the slow cooker is a fantastic choice. After searing the roast and preparing your braising liquid and vegetables on the stovetop, transfer everything to your slow cooker. Cook on LOW for 7-8 hours (or HIGH for 3-4 hours if pressed for time, though LOW is preferred for maximum tenderness).
- Instant Pot Method: For those seeking speed without sacrificing tenderness, the Instant Pot delivers. Utilize the sauté function to sear the roast and brown aromatics. Add liquid and vegetables, then cook on high pressure for 60-90 minutes, depending on the size of your roast. Crucially, allow a natural pressure release for at least 10 minutes (or fully) to prevent the meat from becoming tough.
Crafting the Perfect Accompaniments & Gravy
A great Yankee Pot Roast isn't just about the beef; it's about the harmonious symphony of flavors from the vegetables and the luxurious, savory gravy that brings everything together.
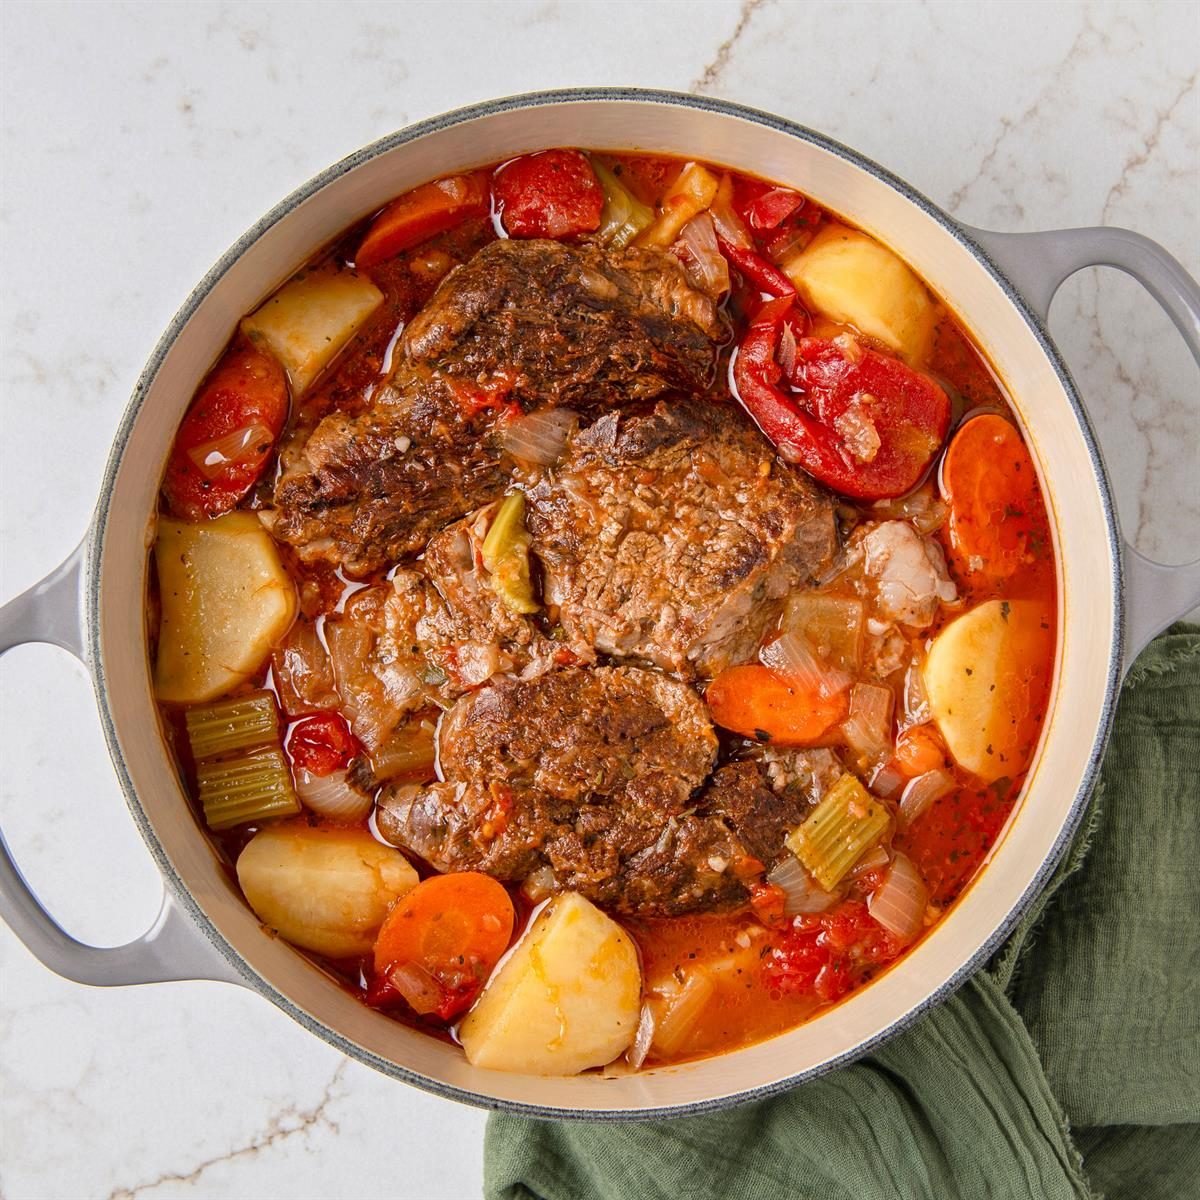
The Vegetable Medley:
The traditional triumvirate of onions, carrots, and celery forms the backbone of flavor, often added after searing the meat and lightly browned to deepen their sweetness. Pearl onions add a delightful delicate touch and visual appeal. But don't feel limited! Consider adding:
- Mushrooms: Sliced cremini or button mushrooms add an earthy umami depth.
- Root Vegetables: Swap traditional potatoes for sweet potatoes or parsnips for a different flavor profile. Small new potatoes can also be added during the last hour of cooking for a complete one-pot meal.
- Herbs & Spices: Beyond salt and pepper, allspice berries offer a classic touch. Fresh rosemary and thyme sprigs, added during braising, infuse the dish with aromatic notes. A bay leaf is also a wonderful addition.
The Rich Braising Liquid:
The liquid your roast simmers in is paramount to its flavor. Dry red wine, such as Merlot, is a common and highly recommended addition, bringing acidity and depth that cuts through the richness of the beef. If you prefer to avoid wine, simply substitute with extra beef stock. For a unique twist, try swapping the wine for a dark beer or stout, which imparts a malty, robust flavor. High-quality beef broth is essential for the base, ensuring a savory foundation.
Perfecting the Gravy:
Once your beef is fall-apart tender and resting, it’s time to transform the flavorful braising liquid into a velvety gravy:
- Skim Fat: For a leaner gravy, carefully skim off any excess fat that has risen to the surface of the cooking liquid. This is crucial for a smooth, less greasy mouthfeel.
- Strain (Optional): Many prefer to strain the liquid to remove the cooked-down vegetables and herbs, resulting in a perfectly smooth gravy. The cooked vegetables can then be served alongside the beef or discarded.
- Thicken: Create a slurry by dissolving 2 tablespoons of cornstarch in a small amount of cold water (or reserved cold broth). Bring the skimmed cooking liquid to a simmer over medium heat, then slowly whisk in the cornstarch slurry. Stir continuously until the gravy thickens to your desired consistency. Season with additional salt and pepper to taste.
Remember to remove the beef to a cutting board and allow it to rest for at least 10 minutes before slicing or shredding. This allows the juices to redistribute, ensuring maximum tenderness.
Customizing Your Yankee Pot Roast Experience
While tradition offers a wonderful starting point, the beauty of Yankee Pot Roast lies in its adaptability. Don't be afraid to experiment and make it your own.
- Beef Cuts: While chuck roast is often king for its marbling and collagen, a beef round tip roast can also yield tender results with careful low-and-slow cooking, often a bit leaner.
- Aromatics: Besides the classics, consider adding parsnips, turnip chunks, or even a leek for varied flavors.
- Spices: Beyond allspice, a hint of cloves, juniper berries, or even a pinch of smoked paprika can add intriguing dimensions.
- Liquid Enhancements: A tablespoon or two of tomato paste browned with the aromatics adds another layer of umami and color. Worcestershire sauce or a dash of balsamic vinegar can also deepen the flavor profile.
- Serving Suggestions: While often served with its own cooked vegetables and gravy, a side of creamy mashed potatoes or crusty bread is perfect for soaking up every last drop of that incredible sauce.
Mastering the Yankee Pot Roast is a journey of patience and technique, but the rewards are immeasurable. By focusing on a thorough sear, embracing the low-and-slow cooking philosophy, perfecting your gravy, and confidently exploring variations, you'll create a dish that not only satisfies hunger but also nourishes the soul. It's truly a timeless classic that brings joy and comfort to any table. So, roll up your sleeves, follow these essential tips, and get ready to unlock the perfect, tender results of this beloved comfort food.
